
Wait! Don’t Go Yet! 👋
We see you eyeing those adorable outfits! 😍 Before you leave, here’s 10% OFF your first order!
Hurry, your little one’s next favorite outfit is waiting! 🛍️✨
We see you eyeing those adorable outfits! 😍 Before you leave, here’s 10% OFF your first order!
Hurry, your little one’s next favorite outfit is waiting! 🛍️✨
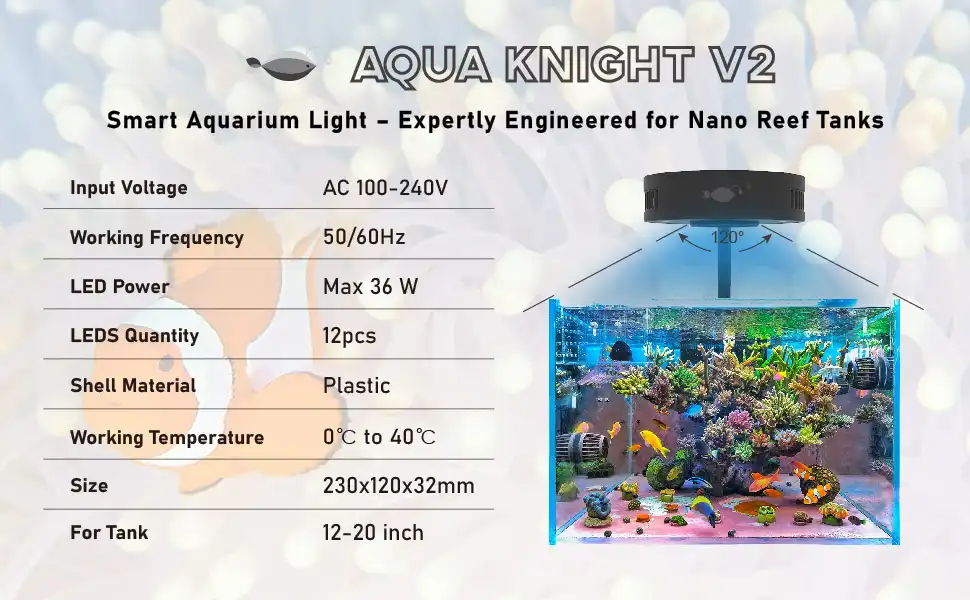
Introducing the SPV2: our dedicated smart marine aquarium light, specifically designed for micro marine tanks of 30 gallons or less. Built as an upgraded version of our best-selling Aquaknight M029 marine light, it comes with key improvements—most notably, a smart upgrade that equips the light with intelligent control and three-stage timing functions. For detailed information on its full features, please refer to the page linked below.
These two diagrams show the main function areas and button function guides of the SPV2.
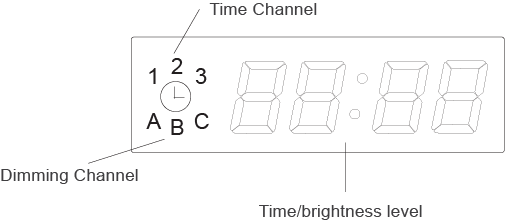

Step 1: Touch the “OK” button and hold for about 3 seconds—the displayed numbers will flash, allowing you to enter the local time (hours) setting.
Step 2: Touch “+” or “-” to adjust the hours (from 0-24).
Step 3: Touch “OK” to enter the minutes setting.
Step 4: Touch “+” or “-” to adjust the minutes (from 0-59).
Step 5: Touch “OK” to save the time setting and enter the dimming setting; or touch “ESC” to save the time setting and exit the setting mode.
Step 1: Touch the “OK” button and hold for about 3 seconds— the displayed numbers will flash to enter the setting mode. (For initial entry, please refer to the Time Setting steps above.)
Step 2: Touch “OK” to access the dimmer setting (the number “1” will light up on the LED screen).
Step 3: Touch “+” or “-” to set the hours and minutes for the first time period.
Step 4: Touch “OK”— the letter “A” will light up on the display, and the numbers on the right will flash, allowing you to enter Channel A’s brightness setting.
Step 5: Press “+” or “-” to increase or decrease the brightness of Channel A (adjustable range: 0-100).
Step 6: Touch “OK”— the letter “B” will light up on the display, and the numbers on the right will flash, allowing you to enter Channel B’s brightness setting.
Step 7: Press “+” or “-” to increase or decrease the brightness of Channel B (adjustable range: 0-100).
Step 8: Touch “OK”— the letter “C” will light up on the display, and the numbers on the right will flash, allowing you to enter Channel C’s brightness setting.
Step 9: Press “+” or “-” to increase or decrease the brightness of Channel C (adjustable range: 0-100).
Step 10: Touch “OK”— the number “2” will light up on the display, allowing you to enter the second time period setting.
Touch “ESC” to save all time and dimmer settings. The light will run automatically according to the programmed schedule every day.
Please read this manual carefully before using the product, and keep the instruction manual in a safe place for future reference.
Our company shall not be liable for any product defects, damages, or losses caused by improper use, maintenance, or failure to follow the instructions in this manual.
Do not disassemble, modify, or reassemble the product by yourself—such actions may cause equipment damage, electrical hazards, or void the product warranty.