
How to Operate SPV2 Reef Aquarium Light: A Complete Guide
The SPECTRAQUA SPV3 reef aquarium light (a.k.a. Aqua Knight M029 V3) is a next-gen smart LED aquarium light—a third-generation derivative of our best-selling Aqua Knight M029. Building on the success of its predecessor, we’ve upgraded it significantly: the maximum power has been boosted from 27W to 75W, and we’ve added smart functionality, making it perfectly suited for 28–50 gallon saltwater tanks. Featuring three fully customizable dimming channels and three programmable timers, this light offers complete control over your tank’s lighting schedule—whether you’re simulating sunrise, daylight, or moonlight—truly living up to its reputation as a professional-grade aquarium light.
Function Instructions
Note:
Please read this manual before using, and keep the instruction manual properly.
Our company is not responsible for any defective caused by improper use and maintenance.
Please do not disassemble or assemble the product that may cause damage.
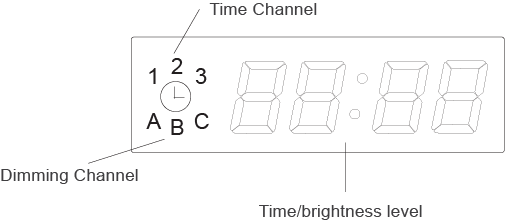
1、Time Setting
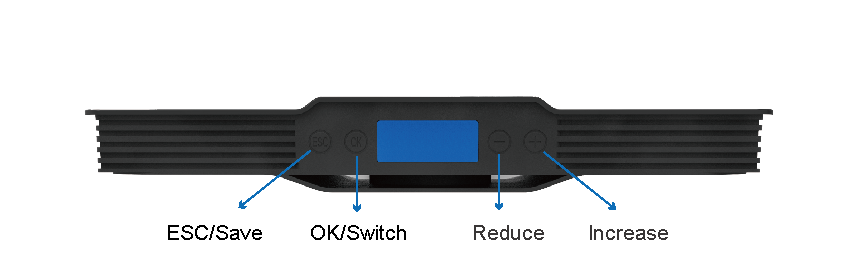
Step 1: Touch the “OK” button and hold for about 3 seconds—the displayed numbers will flash, allowing you to enter the local time (hours) setting.
Step 2: Touch “+” or “-” to adjust the hours (from 0-24).
Step 3: Touch “OK” to enter the minutes setting.
Step 4: Touch “+” or “-” to adjust the minutes (from 0-59).
Step 5: Touch “OK” to save the time setting and enter the dimming setting; or touch “ESC” to save the time setting and exit the setting mode.
2、Dimmer Setting
Step 1: Touch the “OK” button and hold for about 3 seconds— the displayed numbers will flash to enter the setting mode. (For initial entry, please refer to the Time Setting steps above.)
Step 2: Touch “OK” to access the dimmer setting (the number “1” will light up on the LED screen).
Step 3: Touch “+” or “-” to set the hours and minutes for the first time period.
Step 4: Touch “OK”— the letter “A” will light up on the display, and the numbers on the right will flash, allowing you to enter Channel A’s brightness setting.
Step 5: Press “+” or “-” to increase or decrease the brightness of Channel A (adjustable range: 0-100).
Step 6: Touch “OK”— the letter “B” will light up on the display, and the numbers on the right will flash, allowing you to enter Channel B’s brightness setting.
Step 7: Press “+” or “-” to increase or decrease the brightness of Channel B (adjustable range: 0-100).
Step 8: Touch “OK”— the letter “C” will light up on the display, and the numbers on the right will flash, allowing you to enter Channel C’s brightness setting.
Step 9: Press “+” or “-” to increase or decrease the brightness of Channel C (adjustable range: 0-100).
Step 10: Touch “OK”— the number “2” will light up on the display, allowing you to enter the second time period setting.
- Repeat Steps 3-9 to set the brightness of Channels A, B, and C for the second time period.
- Repeat Steps 3-9 again to set the brightness of Channels A, B, and C for the third time period.
Touch “ESC” to save all time and dimmer settings. The light will run automatically according to the programmed schedule every day.
3、Installation
Step 1: fix the bracket on the lamp with screws and ensure that the screws are tightened.
Step 2: fix the bracket foot, bracket and connecting rod together with screws, and fix the screws after selecting the appropriate length.
Step 3: fix the lamp on the fish tank with bolts and tighten the screws to power on.

Important Notes
Please read this manual carefully before using the product, and keep the instruction manual in a safe place for future reference.
Our company shall not be liable for any product defects, damages, or losses caused by improper use, maintenance, or failure to follow the instructions in this manual.
Do not disassemble, modify, or reassemble the product by yourself—such actions may cause equipment damage, electrical hazards, or void the product warranty.